Expose agent
Expose the agent's API over HTTPS
The actuated agent serves HTTP, and is accessed by the Actuated control plane.
We expect most of our customers to be using hosts with public IP addresses, and the combination of an API token plus TLS is a battle tested combination.
For anyone running with private hosts within a firewall, a private peering option is available for enterprise companies, or our inlets network tunnel can be used with an IP allow list.
For a host on a public cloud
If you're running the agent on a host with a public IP, you can use the built-in TLS mechanism in the actuated agent to receive a certificate from Let's Encrypt, valid for 90 days. The certificate will be renewed by the actuated agent, so there are no additional administration tasks required.
The installation will automatically configure the below settings. They are included just for reference, so you can understand what's involved or tweak the settings if necessary.
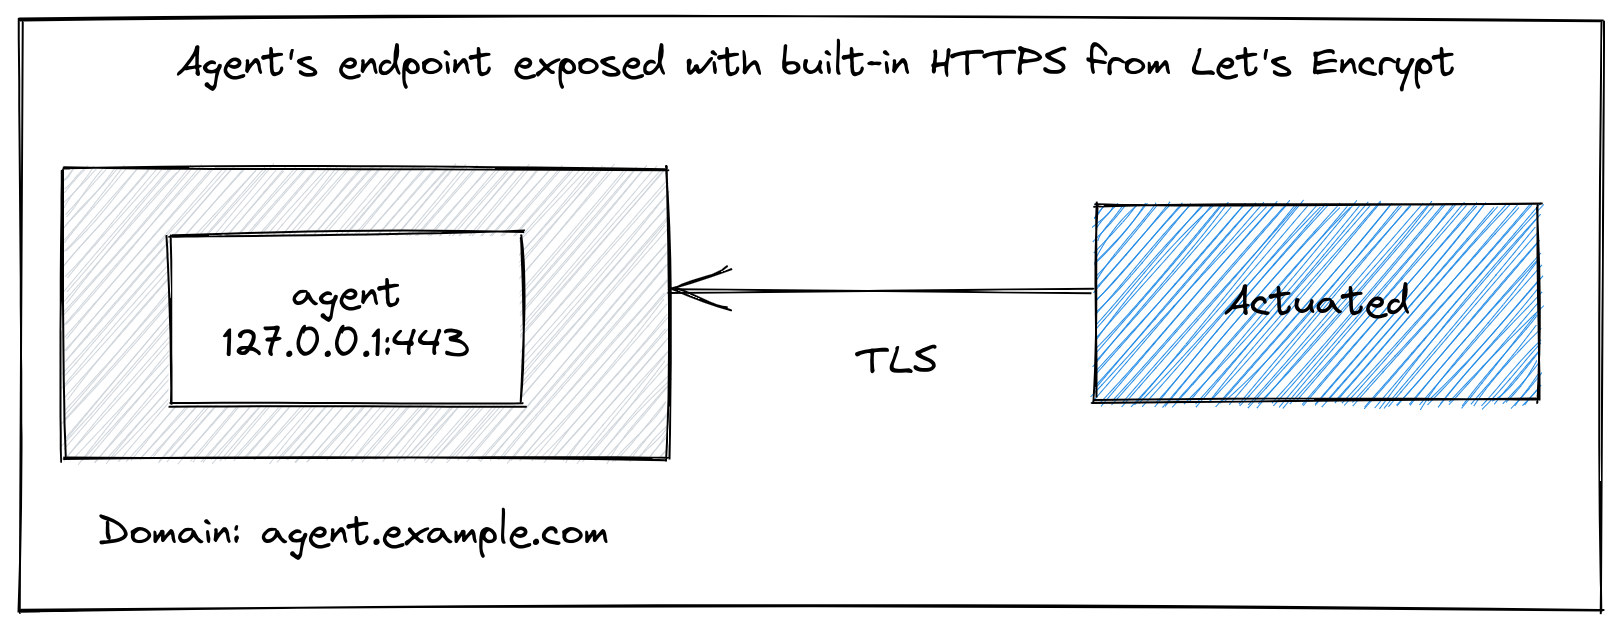
Pictured: Accessing the agent's endpoint built-in TLS and Let's Encrypt
Determine the public IP of your instance:
# curl -s http://checkip.amazonaws.com

141.73.80.100
Now imagine that your sub-domain is agent.example.com, you need to create a DNS A or DNS CNAME record of agent.example.com=141.73.80.100, changing both the sub-domain and IP to your own.
Once the agent is installed, edit /etc/default/actuated on the agent and set the following two variables:
AGENT_LETSENCRYPT_DOMAIN="agent.example.com"
AGENT_LETSENCRYPT_EMAIL="webmaster@agent.example.com"
Restart the agent:
sudo systemctl daemon-reload
sudo systemctl restart actuated
Your agent's endpoint URL is going to be: https://agent.example.com on port 443
Private hosts - private peering for enterprises
For enterprise customers, we can offer private peering of the actuated agent for when your servers are behind a corporate firewall, or have no inbound Internet access.
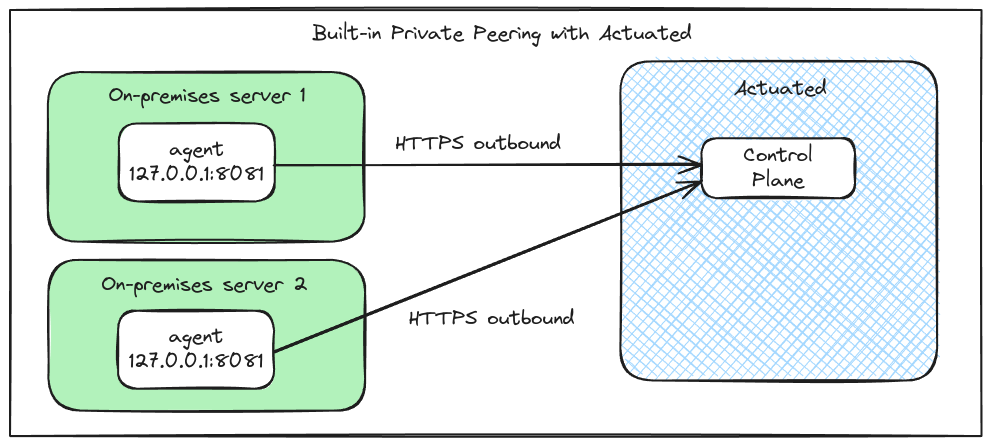
Peering example for an enterprise with two agents within their own private firewalls.
This option is built-into the actuated agent, and requires no additional setup, firewall or routing rules. It's similar to how the GitHub Actions agent works by creating an outbound connection, without relying on any inbound data path.
- The client makes an outbound connect to the Actuated control-plane.
- If for any reason, the connection gets closed or severed, it will reconnect automatically.
- All traffic is encrypted with HTTPS.
- Only the Actuated control-plane will be able to communicate with the agent, privately.
Private hosts - behind NAT or at the office
The default way to configure a server for actuated, is to have its HTTPS endpoint available on the public Internet. A quick and easy way to do that is with our inlets network tunnel tool. This works by creating a VM with a public IP address, then connecting a client from your private network to the VM. Then the port on the private machine becomes available on the public VM for the Actuated control-plane to access as required.
An IP allow-list can also be configured with the egress IP address of the Actuated control-plane. We will provide the egress IP address upon request to customers.
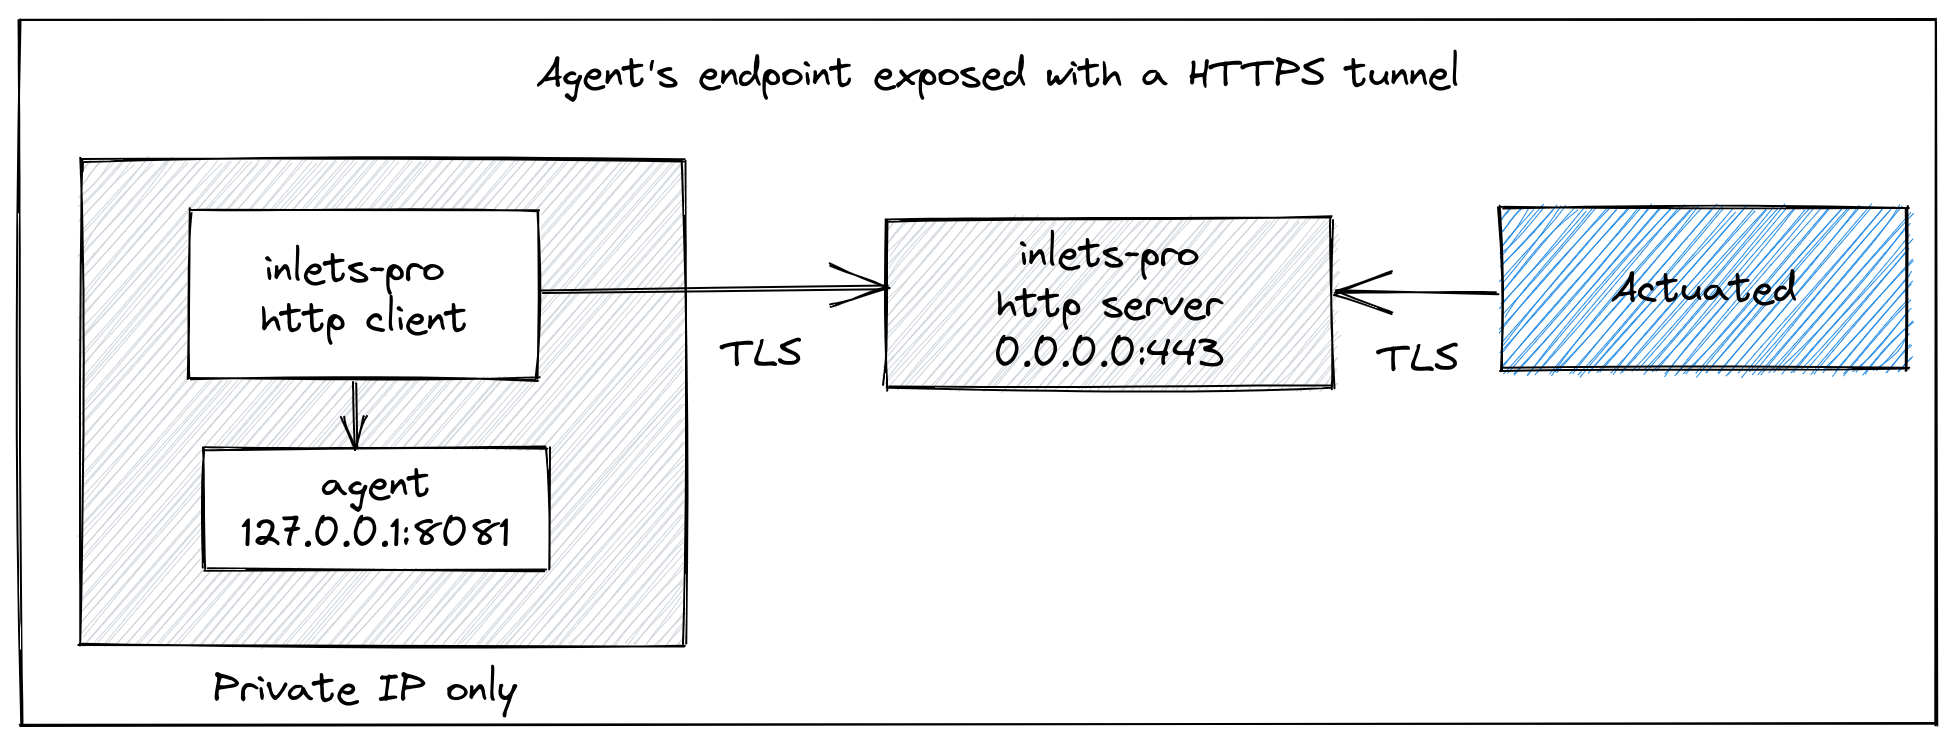
Pictured: Accessing the agent's private endpoint using an inlets-pro tunnel
Reach out to us if you'd like us to host a tunnel server for you, alternatively, you can follow the instructions below to set up your own.
The inletsctl tool will create a HTTPS tunnel server with you on your favourite cloud with a HTTPS certificate obtained from Let's Encrypt.
If you have just the one Actuated Agent:
export AGENT_DOMAIN=agent1.example.com
export LE_EMAIL=webmaster@agent1.example.com

arkade get inletsctl
sudo mv $HOME/.arkade/bin/inletsctl /usr/local/bin/

inletsctl create \
    --provider digitalocean \
    --region lon1 \
    --token-file $HOME/do-token \
    --letsencrypt-email $LE_EMAIL \
    --letsencrypt-domain $AGENT_DOMAIN
Then note down the tunnel's wss:// URL and token.
If you wish to configure an IP allow list, log into the VM with SSH and then edit the systemd unit file for inlets-pro. Add the actuated controller egress IP as per these instructions.
Then run a HTTPS client to expose your agent:
inlets-pro http client \
    --url $WSS_URL \
    --token $TOKEN \
    --upstream http://127.0.0.1:8081
For two or more Actuated Servers:
export AGENT_DOMAIN1=agent1.example.com
export AGENT_DOMAIN2=agent2.example.com
export LE_EMAIL=webmaster@agent1.example.com

arkade get inletsctl
sudo mv $HOME/.arkade/bin/inletsctl /usr/local/bin/

inletsctl create \
    --provider digitalocean \
    --region lon1 \
    --token-file $HOME/do-token \
    --letsencrypt-email $LE_EMAIL \
    --letsencrypt-domain $AGENT_DOMAIN1 \
    --letsencrypt-domain $AGENT_DOMAIN2
Then note down the tunnel's wss:// URL and token.
Then run a HTTPS client to expose your agent, using the unique agent domain, run the inlets-pro client on the Actuated Servers:
export AGENT_DOMAIN1=agent1.example.com
inlets-pro http client \
    --url $WSS_URL \
    --token $TOKEN \
    --upstream $AGENT1_DOMAIN=http://127.0.0.1:8081
export AGENT_DOMAIN2=agent2.example.com
inlets-pro http client \
    --url $WSS_URL \
    --token $TOKEN \
    --upstream $AGENT1_DOMAIN=http://127.0.0.1:8081
You can generate a systemd service (so that inlets restarts upon disconnection, and reboot) by adding --generate=systemd > inlets.service and running:
sudo cp inlets.service /etc/systemd/system/
sudo systemctl daemon-reload
sudo systemctl enable inlets.service
sudo systemctl start inlets

# Check status with:
sudo systemctl status inlets
Your agent's endpoint URL is going to be: https://$AGENT_DOMAIN.
Preventing the runner from accessing your local network
Network segmentation
Proper network segmentation of hosts running the actuated agent is required. This is to prevent runners from making outbound connections to other hosts on your local network. We will not accept any responsibility for your configuration.
If hardware isolation is not available, iptables rules may provide an alternative for isolating the runners from your network.
Imagine you were using a LAN range of 192.168.0.0/24, with a router of 192.168.0.1, then the following probes and tests show that the runner cannot access the host 192.168.0.101, and that nmap's scan will come up dry.
We add a rule to allow access to the router, but reject packets going via TCP or UDP to any other hosts on the network.
sudo iptables --insert CNI-ADMIN \
    --destination  192.168.0.1 --jump ACCEPT
sudo iptables --insert CNI-ADMIN \
    --destination  192.168.0.0/24 --jump REJECT -p tcp  --reject-with tcp-reset
sudo iptables --insert CNI-ADMIN \
    --destination  192.168.0.0/24 --jump REJECT -p udp --reject-with icmp-port-unreachable
You can test the efficacy of these rules by running nmap, mtr, ping and any other probing utilities within a GitHub workflow.
name: CI

on:
  pull_request:
    branches:
      - '*'
  push:
    branches:
      - master
      - main

jobs:
  specs:
    name: specs
    runs-on: actuated
    steps:
      - uses: actions/checkout@v1
      - name: addr
        run: ip addr
      - name: route
        run: ip route
      - name: pkgs
        run: |
             sudo apt-get update && \
              sudo apt-get install traceroute mtr nmap netcat -qy
      - name: traceroute
        run: traceroute  192.168.0.101
      - name: Connect to ssh
        run: echo | nc  192.168.0.101 22
      - name: mtr
        run: mtr -rw  -c 1  192.168.0.101
      - name: nmap for SSH
        run: nmap -p 22  192.168.0.0/24
      - name: Ping router
        run: |
          ping -c 1  192.168.0.1
      - name: Ping 101
        run: |
          ping -c 1  192.168.0.101